Hello again. So this is the first in the mini tutorials that I'm putting together. I wanted to go over the basics; ISO, aperture and shutter speed. These are all super important when you are taking pictures. The goal is to get your digital camera off the auto setting and start using one of the other settings like the aperture priority or the manual setting. Additionally, it's important to know what tools you have available if you are in a situation in which let's say, you're in a dark room and can't use flash or your subject is moving and you want to catch a sharp photo.
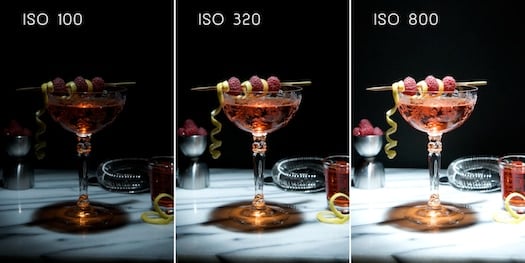
Alright, so let's talk about ISO. It basically is how sensitive your camera sensor is to light and it's measured in a number like 400, 600, etc. A lower number of ISO, the less sensitive the sensor is to light. How does this translate into the actual image? Less grain (or noise) in the picture. A higher ISO means the sensor is more sensitive to light. This can result in a grainy picture. I'll go over that more in a moment. Ok, that's pretty much the intro to what ISO is. Now, about how to use it. When you are taking photos in a well lit environment (or you are using a tripod) then you can use a low ISO, like 100 or 200. But once the lighting situation begins to become not ideal, then changing your ISO is helpful. You can try bumping up your ISO bit by bit until you are satisfied with the image. This will also increase the amount of noise in your photo, but if you have post processing software like Photoshop or Lightroom or something like that, then you can usually do a pretty good job of smoothing out the image. Also, if your subject is moving, or you are in a place that doesn't allow flash (like a church or music venue, etc), or you don't want to use flash to get a certain effect, then you may want to increase ISO. That's pretty much it. ISO is fairly simple. The best thing you can do is go out and practice taking pictures in different light using different ISO and then look at the shots to get an understanding of how ISO manifests in the actual images. It's really helpful if you do this. A really great example is below. You can see that with the increasing ISO, there is more light and therefore the photo is more properly exposed:
 source: http://whiteonricecouple.com/photography-travels/iso/
Another good example that shows the difference in noise:
 source: http://www.cnet.com/products/canon-powershot-a1000-is/2/
OK, so I think we're done here for now. The next post I'll cover shutter speed since ISO and shutter speed are linked. Let me know if you have any questions about this topic. Thanks for stopping by! Hope this mini-tutorial was helpful.


