So, my first post Mini-Tutorial post was about
ISO and this one is closely related, shutter speed. Really basic first, you probably already know, but the shutter is the round thing over the lens that closes and opens when you push down on the button to take the picture. The purpose of a shutter is to allow light in to expose the picture. Then, the shutter speed is the time that the shutter is open. Pretty simple, huh? It does get more complicated, but I'm going to try to keep it simple and just to the bits that you need to know for basic photography. Next, the amount of light that hits the sensor is proportional to the exposure time. Shutter speed is measured in seconds and written as a fraction, such as 1/250 s, 1/125 s, 1/60 s, etc. with each increment doubling the amount of light when the shutter speed is longer and halving the amount of light when the speed is shorter. Now remember, this is a fraction, so the bigger the number is on the bottom, the shorter the shutter speed is, or the faster the shutter closes. This means that less light will reach the sensor. The larger the number on the bottom of the fraction is, the longer the shutter speed, which means the sensor will stay open for longer and let more light reach the sensor. Most DSLR cameras also have an option for whole seconds rather than fractions of a second, for example, 1 second, 3 seconds, and you may also have an option to shoot in bulb mode (B) which allows you to keep the shutter open as long as you'd like manually, using the camera button, or time (T) which keeps the shutter open for as long as you click the button once to start and then click the button to end. OK, so that's the general idea. Now, what does this all mean practically? A good rule of thumb for taking photos in general is to set the shutter speed to the number closest to your lens focal length (50 mm, for example, is a focal length of a lens). If you are shooting with a 50 mm lens, then you would use 1/60 as your shutter speed. Make sense? OK, now onto something a little more...Shutter speed not only affects the amount of light allowed to reach the sensor, but also can cause an image to be blurry or sharp. If the shutter speed is fast, like 1/250, and there is a good amount of light around, then your image will be sharp and crisp. But if you are using a slow shutter speed like 1/4, you will likely end up with a blurry picture unless you are using a tripod. This is because of camera shake. When you hold a camera and press the button to take the picture, no matter how steady you are, you will shake the camera even the tiniest bit and that will show up in the picture. You probably want to use a faster shutter speed most of the time, 1/60 and above given the light situation, to avoid a blurry picture. Now, there are times when you want to shake it up a little bit and have some texture and movement to your pictures, and you can do this by manipulating the shutter speed (along with ISO and aperture, but that's for another time). If you want a shot that is crisp and sharp and freezes movement, then you will use a fast shutter speed (1/250, 1/500, etc depending on the light situation).

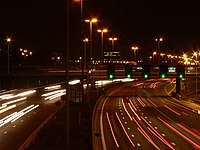
The image on the left was shot using a fast shutter speed, to freeze the motion. The image on the right was shot using a slow shutter speed, dragging out the motion.
source: http://en.wikipedia.org/wiki/Shutter_speed
If you want to show movement, like the water moving over a waterfall or river for example, then you would use a slower shutter speed (1/4 or slower). Keep in mind, you will likely have to adjust ISO and aperture so that you don't overexpose your picture. Oh, and you will probably need a tripod or something sturdy to set your camera on to avoid camera shake, or else your entire picture will be blurry, not the idea we're going for.
.jpg) source: http://www.beckimpressionsphotography.com/photography-101-shutter-speed-motion-tutorial/
source: http://www.beckimpressionsphotography.com/photography-101-shutter-speed-motion-tutorial/
I'll go over more detail of adjusting your ISO, aperture and shutter speed after we cover all the basics. But that is it for now, for shutter speed. I encourage you to go out and practice using different shutter speeds, do some experimenting and look at the differences.
Thanks for reading, and next time I'll cover aperture. My favorite!

No comments:
Post a Comment